Add a video
MODULE 1
Building upon the foundational understanding of TMJ anatomy and assessment from the previous lesson, this lesson presents a comprehensive suite of treatment protocols designed to address the various manifestations of temporomandibular dysfunction. You will learn precise techniques that target muscular tension, joint mechanics, fascial restrictions, and cranial bone imbalances contributing to TMJ dysfunction. These evidence-informed approaches will equip you with the practical skills needed to provide effective, lasting relief for clients suffering from jaw pain, restricted mobility, and related symptoms.
Learning Objectives
Master the TMJ balancing protocol for addressing mechanical joint dysfunction
Develop proficiency in external myofascial techniques for the masticatory muscles
Learn safe and effective intraoral approaches for addressing pterygoid muscle restrictions
Understand temporal-mandibular relationship restoration techniques
Practice hyoid release methods to address compensatory patterns
Explore facial fascia unwinding sequences for comprehensive TMJ relief
Apply appropriate treatment selection criteria based on client presentation
External fascial and muscular techniques form the foundation of TMJ treatment, offering accessible, non-invasive approaches that address superficial and intermediate tension patterns. These techniques serve as essential preparation for deeper work and may provide significant relief for many clients without requiring intraoral intervention.
Massage and Temporalis Release Protocol
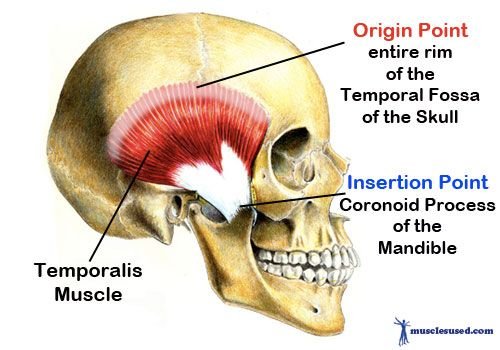
The temporalis muscle plays a critical role in jaw elevation and often holds significant tension in clients with TMJ dysfunction. This protocol addresses temporalis hypertonicity through a progressive release sequence:
Temporalis Mapping and Assessment
1. Position: Client supine with head comfortably supported. Practitioner seated at head of table.
2.Contact: Using finger pads, gently palpate the entire fan-shaped temporalis muscle from the temporal
line of the frontal bone to its insertion at the coronoid process of the mandible.
3. Assessment: Note areas of tension, tenderness, temperature changes, or tissue texture abnormalities. Pay particular attention to the anterior fibers, which often hold the greatest tension.
4. Communication: “I’m gently exploring the temple muscle to identify areas that might be contributing to your jaw tension. Please let me know if any areas feel particularly tender.”
Temporalis Broad Release Technique
1. Position: Maintain supine positioning with practitioner at head of table.
2.Contact: Place full palmar surface of both hands over the bilateral temporalis muscles, with fingers
pointing toward the crown of the head.
3. Technique Application:
Apply gentle, sustained compression into the temporalis muscles. Gradually add a slight cephalad (toward crown) movement to engage the fascia. Hold this engagement while encouraging tissue softening through focused intention and client breathing. As tissue begins to yield, follow the release with gradual decompression.
4.Duration: Maintain contact for 1-3 minutes, allowing for complete fascial response.
5.Client Guidance: “Take slow, deep breaths and allow your jaw to remain relaxed as I help release tension
from these muscles. Notice how the relaxation affects your whole head.”
Temporalis Specific Fiber Technique
1. Position: Client remains supine with practitioner at head of table.
2.Contact: Using finger pads, identify specific fiber bands within the temporalis that present with increased tension.
3. Technique Application:
Apply precise direct pressure to tense fibers using 2-3 fingertips. Maintain pressure while asking client to gently open and close mouth slightly (2-3mm movement). Gradually increase pressure as tissue softens, following the direction of ease. For stubborn areas, apply cross-fiber friction using small amplitude movements perpendicular to fiber direction.
4.Duration: Work each area for 30-60 seconds before moving to the next tension area.
Key Areas: Pay particular attention to:
Anterior fibers near the frontotemporal suture
Middle fibers above the ear
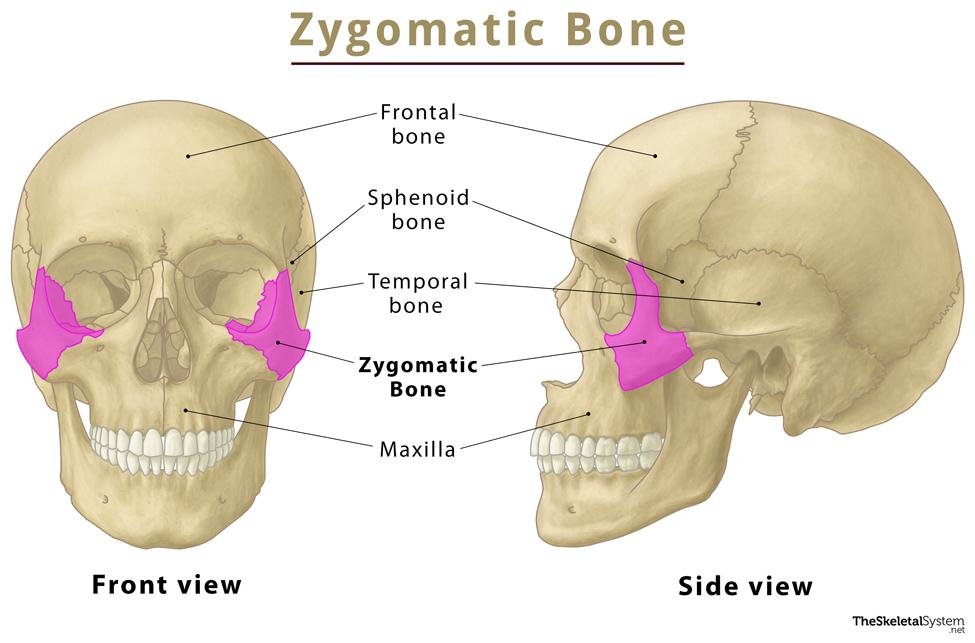
Deep fibers near the zygomatic arch
6. Client Guidance: “I’m working with specific muscle fibers that are holding tension. The small jaw movements help these fibers release more effectively. Notice how the release of these specific areas affects your overall comfort.”
Temporalis Insertion Technique
1. Position: Client supine, practitioner seated at head of table.
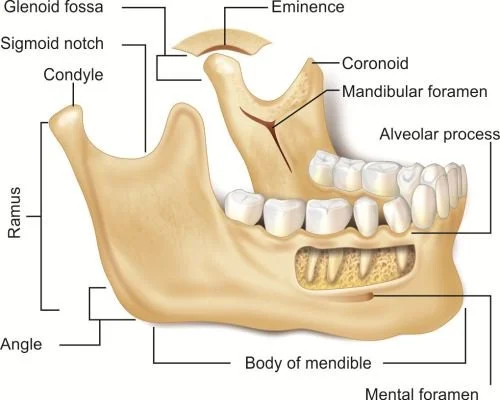
2. Contact: Place thumb or index finger on the coronoid process of the mandible (can be located by having client open and close slightly while palpating anterior to the TMJ).
3. Technique Application:
Apply gentle, sustained pressure to the temporalis insertion point. Direct pressure slightly upward toward the eye socket. Maintain steady pressure while client performs very small jaw opening movements (5-10mm). Gradually increase pressure as tissue tension releases.
4. Duration: Maintain contact for 30-60 seconds on each side.
Client Guidance: “This is where the temple muscle connects to your jaw bone. By releasing tension at this attachment point, we can significantly improve jaw movement. Notice how this affects your ability to open more comfortably.”
Temporalis Integration
1. Position: Client supine, practitioner at head of table.
2. Contact: Return to broad palmar contact over entire temporalis region bilaterally.
3. Technique Application:
Apply very light contact to sense the tissue response to the previous techniques. Follow any subtle movements or unwinding sensations in the tissues. Allow for integration through energetic holding without mechanical pressure.
4.Duration: Maintain integrative contact for 1-2 minutes.
Client Guidance: “Take a moment to notice how your temple region feels different now. Observe the changes in your overall head and jaw sensations as these releases integrate.”
The masseter muscle is often the primary contributor to TMJ pain and dysfunction due to its power and tendency to hold excess tension. This protocol addresses masseter hypertonicity through progressive external techniques:
Masseter Mapping and Assessment
1. Position: Client supine with head comfortably supported, slightly rotated away from the side being assessed. Practitioner seated at side of table.
2. Contact: Using finger pads, gently palpate the masseter muscle from its origin at the zygomatic arch to its insertion at the angle and ramus of the mandible.
3. Assessment: Note thickness, tension bands, tender points, and general tissue quality. Pay particular attention to the deep fibers near the mandibular angle and the superficial fibers crossing the mandibular ramus.
Communication: “I’m exploring the main chewing muscle to understand where it may be holding tension. This area is often tender, so please let me know if anything feels too uncomfortable.”
Superficial Masseter Broad Release
1. Position: Client supine, head slightly rotated away from treatment side. Practitioner seated at side of table.
2. Contact: Place full palmar surface of hand over the masseter muscle with fingers directed toward the ear.
3. Technique Application:
Apply gentle, sustained compression into the masseter muscle.
Gradually add a slight superior and posterior movement to engage the fascia.
Hold this engagement while encouraging tissue softening through client breathing.
As tissue begins to yield, follow the release by gradually reducing pressure.
4. Duration: Maintain contact for 1-2 minutes on each side.
Client Guidance: “As I apply gentle pressure to this strong jaw muscle, allow your jaw to feel heavy and relaxed. With each breath, imagine releasing any holding patterns in this area.”
Masseter Specific Fiber Technique
1. Position: Client remains supine with head slightly rotated. Practitioner at side of table.
2.Contact: Using finger pads or thumb, identify specific fiber bands within the masseter that present with increased tension.
3. Technique Application:
Apply direct pressure to tense fibers using thumb or 2-3 fingertips.
Maintain pressure while asking client to gently open and close mouth slightly (2-3mm movement).
Gradually increase pressure as tissue softens, following the direction of ease.
For stubborn areas, apply cross-fiber friction using small amplitude movements perpendicular to fiber direction.
4. Duration: Work each area for 30-60 seconds before moving to the next tension area.
Key Areas: Pay particular attention to:
Superior attachment near zygomatic arch
Middle fibers over mandibular ramus
Deep fibers near mandibular angle
Client Guidance: “I’m working with specific bundles of muscle fibers now. The small jaw movements help these fibers release more effectively. Notice how the release affects not just your jaw but your entire face.”
Masseter Pincer Technique
1. Position: Client supine, practitioner at side of table.
2. Contact: Using thumb inside the mouth (gloved) and fingers outside on the masseter, create a pincer grip of the muscle. If intraoral work is contraindicated, modify to external pincer grip using thumb and fingers externally.
3. Technique Application:
Gently compress the muscle between thumb and fingers.
Apply slight traction while maintaining compression.
Slowly work along the length of the muscle from origin to insertion.
Vary pressure based on tissue response and client feedback.
4. Duration: Work progressively through the muscle for 2-3 minutes per side.
Client Guidance: “This technique allows me to work more deeply with the jaw muscle. You may feel a pressure sensation or mild discomfort that should not be sharp. Let me know if you need me to adjust the pressure at any point.”
Masseter-Mandible Junction Release
1. Position: Client supine, practitioner at side of table.
2.Contact: Place finger pads along the inferior border of the mandible where the masseter inserts.
3. Technique Application:
Apply gentle pressure directed superiorly against the inferior border of the mandible.
Maintain pressure while client performs very small jaw opening movements.
Gradually work along the mandibular angle and ramus, addressing the entire insertion area.
4. Duration: Work this area for 1-2 minutes per side.
Client Guidance: “I’m now working where this powerful muscle attaches to your jawbone. This area often holds significant tension and releasing it can have profound effects on overall jaw comfort and mobility.”
Masseter Integration
1. Position: Client supine, practitioner at side of table.
2.Contact: Return to broad palmar contact over entire masseter region.
3. Technique Application:
Apply very light contact to sense the tissue response to the previous techniques.
Follow any subtle movements or unwinding sensations in the tissues.
Allow for integration through energetic holding without mechanical pressure.
4.Duration: Maintain integrative contact for 1 minute per side.
Client Guidance: “Take a moment to notice how your jaw feels different now. Notice the space and ease
that may be present. Allow these changes to integrate throughout your facial structures.”
Facial-Fascial Release Sequences
The facial fascial system creates functional continuity throughout the cranial region and significantly influences TMJ function. This sequence addresses fascial restrictions that may contribute to TMJ dysfunction:
Superficial Facial Fascia Assessment
1. Position: Client supine with head comfortably supported. Practitioner seated at head of table.
2. Contact: Place finger pads gently on client’s forehead with minimal pressure.
3. Assessment: Using very light touch, assess the quality of tissue movement, elasticity, hydration, and responsiveness of the superficial facial fascia.
4. Direction Testing: Apply gentle intentional direction testing to determine preference for fascial movement.
5. Communication: “I’m using a very light touch to assess the facial fascial system that connects all the structures of your face. This helps me understand how tension may be distributed throughout the region.”
Frontal Release Technique
1. Position: Client supine, practitioner at head of table.
2. Contact: Place palm of one hand on forehead with fingers directed toward crown of head.
3. Technique Application:
Apply gentle traction in a cephalad direction to engage the frontal fascia.
Hold this engagement while sensing for the fascial release response.
Follow the tissue as it releases, maintaining gentle contact throughout.
Once release is complete, slowly reduce contact pressure to integrate.
4. Duration: Maintain contact for 1-2 minutes.
Client Guidance: “As I apply gentle traction to the tissues of your forehead, notice how this affects tension throughout your face and jaw. Allow the tissues to soften and release with each breath.”
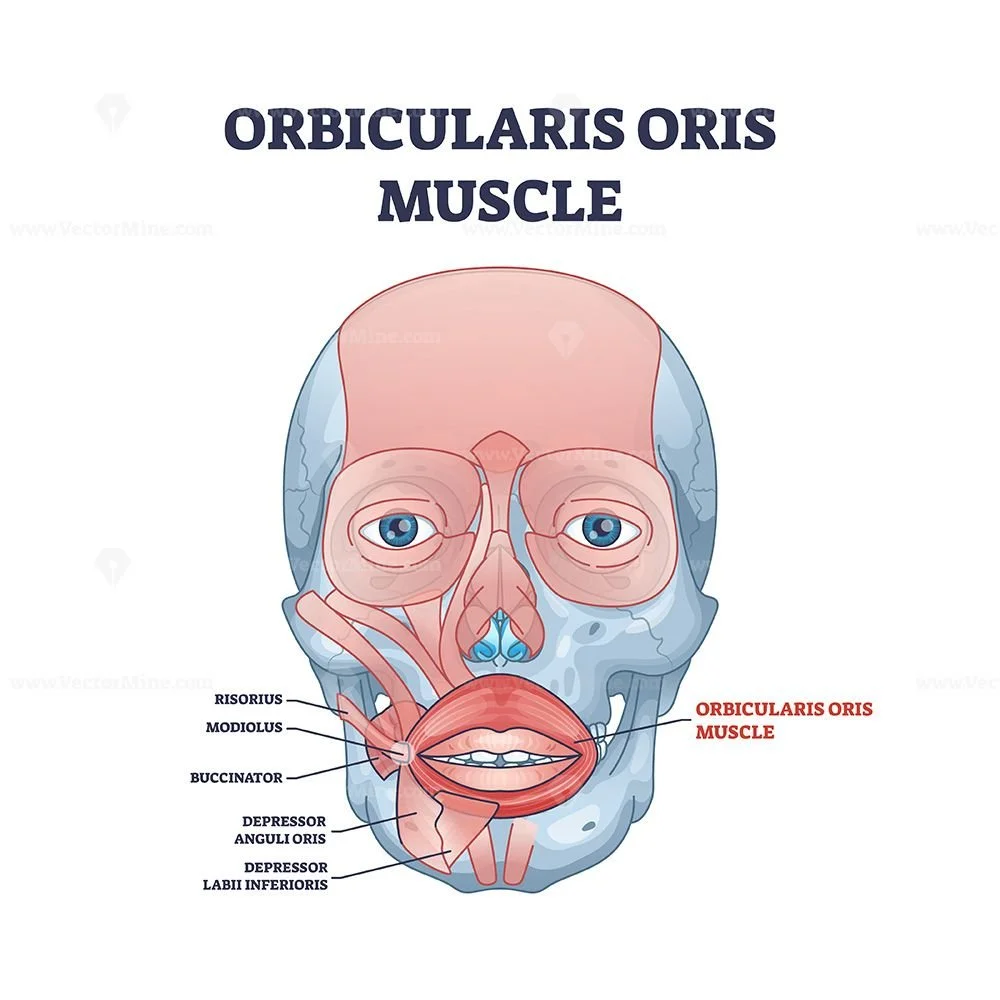
Circumoral Fascial Release
1. Position: Client supine, practitioner at head of table.
2. Contact: Place thumbs at corners of mouth and fingers along mandible or sides of face.
3. Technique Application:
Apply gentle lateral traction at corners of mouth to engage circumoral fascia.
Hold until fascial release is felt.
Transition to superior/inferior traction, engaging vertical fascial components.
Follow tissue response, allowing for complete release before changing direction.
4.Duration: Work this region for 2-3 minutes total.
Client Guidance: “The tissues around the mouth connect directly to your jaw muscles. As these tissues release, notice how this may change the feeling in your jaw and the space inside your mouth.”
Zygomatic-Maxillary Release
1. Position: Client supine, practitioner at head of table.
2. Contact: Place fingertips along zygomatic arches and maxillary region bilaterally.
3. Technique Application:
Apply gentle compression followed by lateral traction to engage the fascia.
Hold until fascial release is felt, following the tissue preference.
Perform gentle circular movements following the fascial unwinding response.
Gradually decrease pressure to integrate the release.
4. Duration: Maintain contact for 1-2 minutes.
Client Guidance: “These facial bones form connections with your jaw. As I help release tension in these areas, notice how the space around your jaw joint may change and how your bite might feel different.”
Mandibular Fascia Technique
1. Position: Client supine, practitioner at head of table.
2. Contact: Place fingers along the inferior border of the mandible from symphysis to angle bilaterally.
3. Technique Application:
Apply gentle inferior traction to engage the submandibular fascia.
Hold this engagement while sensing for the fascial release response.
Follow any rotational or side-bending preferences in the tissue.
Gradually transition to work along the entire mandibular border.
4. Duration: Work progressively along the mandible for 2-3 minutes.
Client Guidance: “The tissues under your jaw influence both your jaw movement and your neck comfort. As these tissues release, notice how this creates more space and freedom in your entire jaw and neck region.”
Facial Fascial Integration
1. Position: Client supine, practitioner at head of table.
2. Contact: Place one hand gently on forehead and one hand under occiput.
3. Technique Application:
Apply very light contact with both hands.
Create a subtle cranial hold that encompasses the entire facial and cranial fascial system.
Allow for integration of all previous techniques through this global holding.
Follow any subtle movements or unwinding sensations in the entire cranial system.
4. Duration: Maintain integrative contact for 2-3 minutes.
Client Guidance: “Take some time to notice how your entire face and head feel different now. Allow these changes to integrate throughout your body, noticing connections between your jaw, face, neck, and beyond.”
Intraoral Techniques for TMJ Dysfunction
Intraoral techniques provide direct access to deeper structures that significantly influence TMJ function but cannot be effectively addressed through external approaches alone. These techniques require special consideration for infection control, client comfort, and technical precision.
Practical Considerations for Intraoral Work
Infection Control Protocols
Gloves: Always use new, disposable nitrile or latex gloves for intraoral work. Change gloves between clients and if contaminated during treatment.
Hand Hygiene: Perform thorough handwashing immediately before donning gloves.
Client Preparation: Offer antibacterial mouth rinse before intraoral work to reduce oral bacterial load.
Environment: Maintain clean treatment surfaces and replace all coverings between clients.
Disposal: Properly dispose of gloves and any contaminated materials in appropriate biohazard containers.
Client Comfort Considerations
Clear Explanation: Thoroughly explain intraoral techniques before performing them, detailing what client will feel and expected benefits.
Consent: Obtain specific verbal consent for intraoral work, separate from general treatment consent.
Communication System: Establish hand signals for client to indicate discomfort or need for pause since verbal communication is limited during intraoral work.
Positioning: Ensure client’s head is well-supported with neck in neutral position to prevent strain.
Pressure Modulation: Begin with very light pressure and gradually increase based on client response.
Duration: Keep individual intraoral techniques brief (30-90 seconds) to prevent client fatigue or discomfort.
Contraindications and Precautions
Absolute Contraindications:
Active oral infections or lesions
Recent oral surgery or dental work (within 2 weeks)
Severe gag reflex that cannot be managed
History of jaw dislocation without medical clearance
Significant respiratory difficulties that prevent breathing through nose
Relative Contraindications/Precautions:
Mild to moderate gag reflex (use adaptation techniques)
Significant dental work (crowns, bridges) requiring gentler pressure
TMJ inflammation (modify technique to indirect or lighter approach)
Clients with trauma history (ensure appropriate pacing and control)
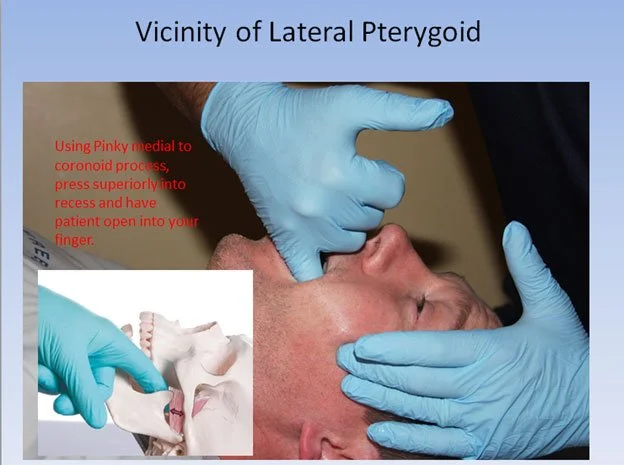
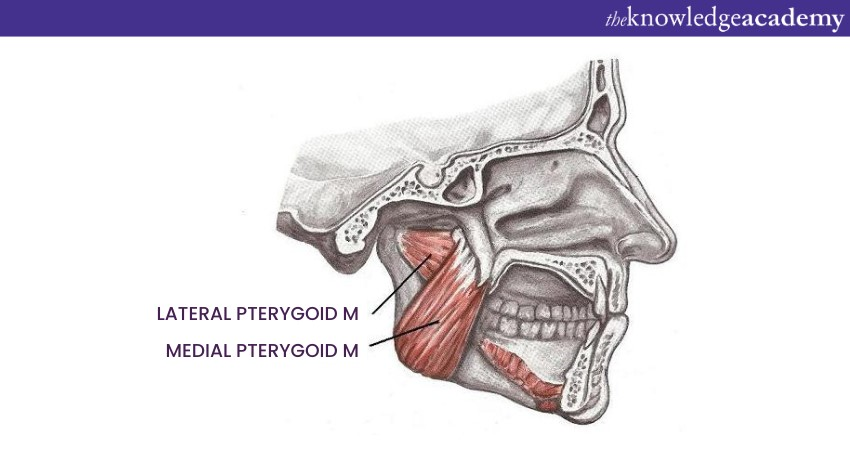
Pterygoid Muscle Release Techniques
The pterygoid muscles, particularly the lateral pterygoid, play a crucial role in TMJ function and dysfunction. These techniques provide effective approaches for addressing these otherwise inaccessible muscles.
Lateral Pterygoid Release – Basic Technique
1. Position: Client supine with head supported, turned slightly away from treatment side. Practitioner seated at side of table, positioned to maintain comfortable posture during intraoral work.
2. Preparation: appropriate gloves after thorough handwashing. Explain procedure and establish non-verbal communication signals. Request client to report any significant discomfort immediately.
3. Contact:
Stabilize client’s head gently with non-working hand.
With gloved index finger of working hand, enter oral cavity along buccal surface of maxillary molars.
Direct finger posteriorly and slightly superiorly behind last molar toward pterygoid plate region.
Locate the concavity posterior and medial to maxillary tuberosity.
4. Technique Application:
Apply gentle pressure in a posterior, superior, and slightly lateral direction.
Begin with very light pressure, gradually increasing based on tissue response.
Maintain steady pressure for 30-45 seconds, allowing for tissue release.
For enhanced release, ask client to perform small jaw opening movements (5-10mm) while maintaining pressure.
5. Tissue Response: Feel for tissue softening, reduced tenderness, or subtle fascial unwinding sensations.
Duration: Maintain contact for 30-60 seconds.
Exit Strategy: Gradually reduce pressure before slowly withdrawing finger from oral cavity.
Client Guidance: “I’m now accessing a deep jaw muscle that helps move your jaw forward and sideways. This muscle is often involved in jaw clicking and pain. Breathe normally through your nose and allow your jaw to remain relaxed. The pressure should feel like a good stretch, not sharp pain.”
Lateral Pterygoid – Advanced Technique
1. Position: Same as basic technique.
2.Contact: Access lateral pterygoid as in basic technique, but with more specific fiber orientation awareness.
3. Technique Application:
Differentiate between superior head (attaches to disc and capsule) and inferior head (attaches to condyle).
For superior head focus: Direct pressure more superiorly.
For inferior head focus: Direct pressure more laterally.
Apply specific fiber stretching by asking client to perform movement opposite to muscle action:
Have client gently move jaw to opposite side while maintaining pressure.
Apply resistive pressure during controlled closing movement.
Incorporate pulsed pressure variations: alternate between sustained pressure and slight releases.
4. Duration: Work with various fiber directions for total of 1-2 minutes per side.
Client Guidance: “This advanced technique allows us to work with specific parts of the muscle that may be contributing to your particular jaw issues. The small jaw movements help target exactly the right fibers for release.”
Medial Pterygoid Release Technique
1. Position: Client supine with head supported, turned slightly away from treatment side. Practitioner
2. Contact: With gloved index finger, enter oral cavity and locate the inner surface of the mandibular angle and
ramus. Direct finger medially and slightly posteriorly to contact the medial pterygoid muscle.
3. Technique Application:
Apply gentle pressure in a lateral and slightly anterior direction.
Begin with very light pressure, gradually increasing based on tissue response.
Maintain steady pressure for 30-45 seconds, allowing for tissue release.
For enhanced release, ask client to perform small lateral jaw movements toward the side being treated while maintaining pressure.
4. External Counterforce (Optional): Place opposite hand externally on mandibular angle to provide gentle counterforce during internal work.
5. Duration: Maintain contact for 30-60 seconds per side.
Client Guidance: “I’m now working with another deep jaw muscle on the inner surface of your jaw. This muscle works with the outer jaw muscles to create stability and power. The release here often creates significant relief for jaw tension and pain.”
Intraoral Fascial Techniques
Buccinator Release Technique
1. Position: Client supine, practitioner at side of table.
2. Contact: With gloved index finger, enter oral cavity and place along buccal surface (cheek lining). External hand placed on outside of cheek to create gentle support.
3. Technique Application:
Apply gentle pressure laterally from inside the mouth.
Create a stretching effect on the buccinator muscle and associated fascia.
Work systematically from back to front along the muscle.
Focus on areas of tissue density or restriction.
4. Duration: Work progressively through the muscle for 1-2 minutes per side.
Client Guidance: “This technique addresses the muscle in your cheek that connects with your jaw muscles. Releasing tension here can help reduce pressure on your jaw joint and create more balance in your facial muscles.”
Palatal Aponeurosis Release
1. Position: Client supine, practitioner at head of table.
2. Contact: With gloved index finger, gently contact the midline of the hard palate. External hand may support the frontal bone or maxilla.
3. Technique Application:
Apply very gentle pressure to the midline raphe of the hard palate.
Use small circular or cross-fiber movements to release fascial tension.
Work progressively from anterior to posterior along the palatal midline.
Pay particular attention to the junction of hard and soft palates.
4.Duration: Work progressively for 1-2 minutes total.
Client Guidance: “The roof of your mouth connects to many structures in your skull and jaw. This gentle release helps create more space and flexibility in your entire oral cavity, which indirectly benefits your jaw function.”
Mylohyoid Release Technique
1. Position: Client supine, practitioner at side of table.
2. Contact: With gloved index finger, locate the mylohyoid ridge on the inner surface of the mandible. External hand contacts under the chin to provide counterforce.
3. Technique Application:
Apply gentle pressure along the mylohyoid attachment to the mandible.
Work systematically from anterior to posterior along the attachment.
Use small amount of traction perpendicular to the ridge.
Follow tissue response, allowing for release before moving to next segment.
4.Duration: Work progressively for 1-2 minutes total.
Client Guidance: “This muscle forms the floor of your mouth and connects your jaw to your throat and
hyoid bone. Releasing tension here creates better balance between your jaw and neck, improving overall function.”
TMJ Balancing Protocol
Direct work with the temporomandibular joint itself requires precision, gentleness, and thorough understanding of joint mechanics. The following protocol provides a comprehensive approach to addressing TMJ dysfunction through direct joint techniques.
TMJ Assessment and Palpation
1. Position: Client supine, practitioner seated at head of table.
2. Contact: Place index finger just anterior to ear canal in depression corresponding to TMJ. Place middle finger on opposite TMJ for bilateral comparison.
3. Assessment:
Have client slowly open and close mouth while palpating joint movement.
Note quality of movement, presence of clicking, deviation, or restriction.
Assess joint capsule tenderness through gentle palpation.
Compare bilateral findings to determine symmetry.
4. Communication: “I’m feeling your jaw joints as you open and close to understand exactly how they’re moving. This helps me determine which techniques will be most helpful for your specific situation.”
TMJ Decompression Technique
1. Position: Client supine, practitioner seated at head of table.
2. Contact: Place thumbs on molar tables intraorally (gloved) or index fingers on mandibular angles externally. Support mandible with remaining fingers under chin or along mandibular body.
3. Technique Application:
Apply gentle, sustained inferior traction on the mandible.
Gradually increase traction force until sensing initial tissue resistance.
Hold this position, waiting for tissue release.
As release occurs, follow with slightly increased traction.
Maintain decompression for 30-60 seconds or until complete release is felt.
4. Variations:
External Variation: Use cupped hands under mandibular angles for broader contact.
Combined Approach: Use one hand for traction while other hand monitors joint response.
Angle Variation: Apply traction with slight anterior or posterior vector based on assessment.
5. Client Guidance: “I’m applying gentle traction to create space in your jaw joints. This helps relieve compression and allows the joint structures to reposition naturally. Your job is simply to remain relaxed and allow your jaw to feel heavy in my hands.”
TMJ Glide Techniques
These techniques address specific movement restrictions within the joint by facilitating natural gliding movements that may be restricted.
Medial-Lateral Glide
1. Position: Client supine, practitioner seated at head of table.
2. Contact: Place index and middle fingers over lateral aspect of TMJ. Support mandible with other hand along body or angle.
3. Technique Application:
Apply gentle medial pressure through the lateral aspect of the condyle.
Hold until tissue softening is felt, then slowly release pressure.
Reverse direction if needed, applying gentle lateral pressure to assist lateral glide.
Perform 3-5 repetitions in each direction as indicated by assessment.
4. Client Guidance: “I’m helping your jaw joint move more freely in a side-to-side direction. This often helps reduce catching or sticking sensations and improves smooth jaw movement.”
Anterior-Posterior Glide
1. Position: Client supine, practitioner seated at head of table.
2. Contact: Place index and middle fingers over the anterior aspect of the TMJ/condyle. Support mandible with other hand.
3. Technique Application:
With jaw slightly open (5-10mm), apply gentle posterior pressure through the condyle.
Hold until tissue softening is felt, then slowly release pressure.
For anterior glide, place fingers behind condyle and apply gentle anterior pressure.
Coordinate with client’s breathing: apply pressure during exhalation, ease during inhalation.
Perform 3-5 repetitions in each direction as indicated by assessment.
4. Client Guidance: “I’m now helping your jaw joint move more freely in a front-to-back direction. This helps with smooth opening and closing and often helps resolve clicking issues.”
TMJ Articular Disc Technique
1. Position: Client supine, practitioner seated at head of table.
2. Contact: Place thumb intraorally (gloved) on the retromolar pad behind last molar. Place index finger externally over the TMJ.
Support mandible with remaining fingers.
3. Assessment Phase:
Have client slowly open and close while monitoring disc movement with external finger.
Identify the point during opening where clicking occurs (if present).
Note whether clicking occurs during opening, closing, or both.
4. Technique Application:
For anterior disc displacement:
Apply gentle anterior-to-posterior pressure with intraoral thumb.
Simultaneously apply very gentle inferior traction on mandible.
Hold this position while client performs very small, controlled opening movements just short of where clicking occurs.
Gradually increase opening range as tissue responds.
For posterior disc issues:
Reverse direction of pressure as appropriate.
Focus on creating space in joint through gentle traction.
5. Duration: Work with disc issues for 2-3 minutes, with breaks as needed for client comfort.
Client Guidance: “We’re now working specifically with the disc in your jaw joint that can sometimes become displaced and cause clicking. This technique helps guide the disc back to a more functional position. The small, controlled movements are essential for retraining proper joint function.”
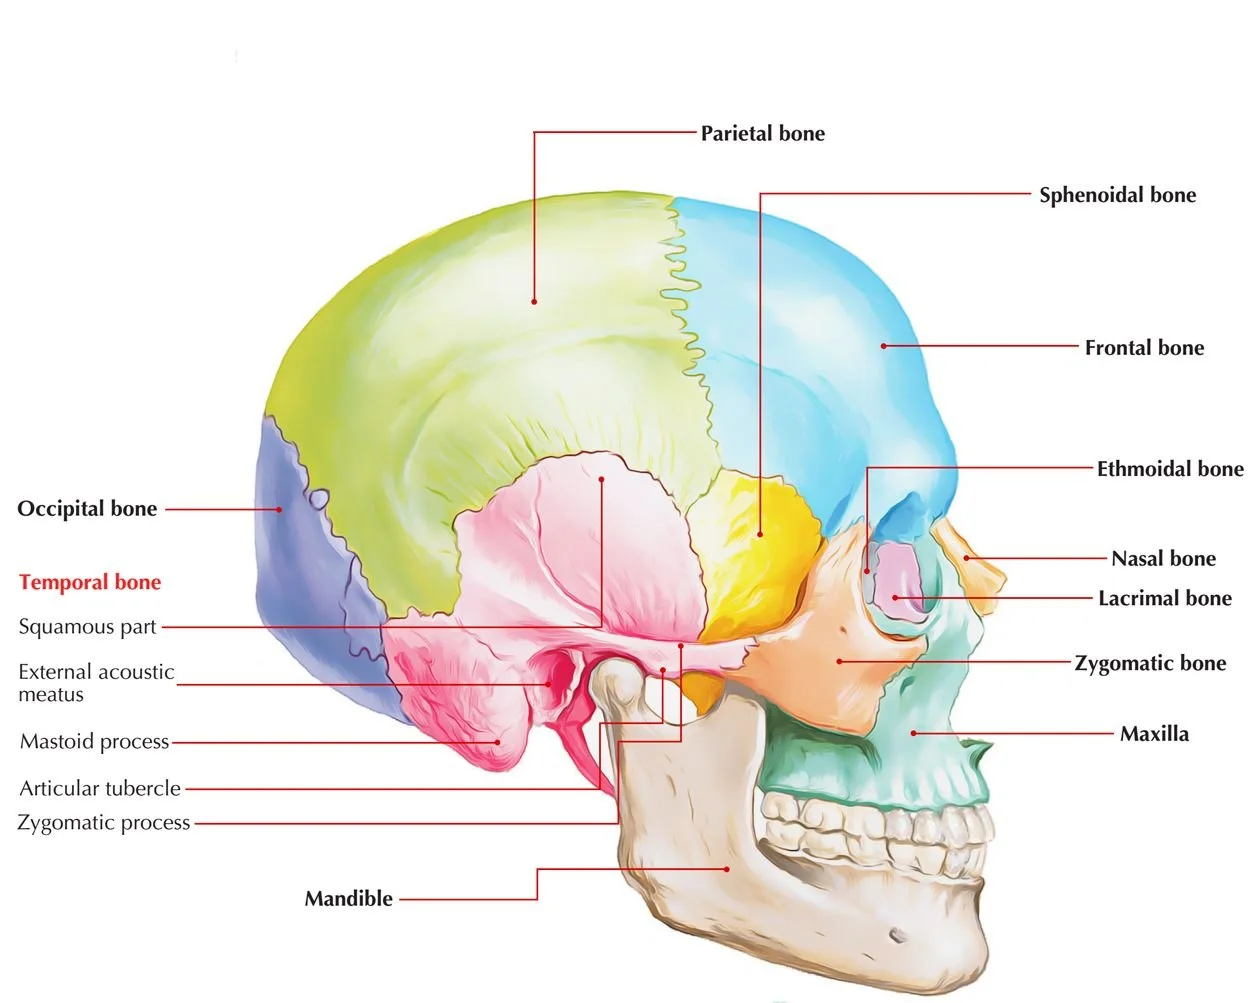
TMJ Mobilization with Cranial Hold
1. Position: Client supine, practitioner seated at head of table.
2. Contact: One hand contacts the temporal bone on affected side, with mastoid process in palm and fingers extending toward parietal region. Other hand contacts the mandible on the same side.
3. Technique Application:
Create synchronous movement between temporal bone and mandible, gently guiding both through micro-movements.
Follow inherent tissue movement, allowing the cranial rhythm to guide the process.
Facilitate external rotation of temporal bone while gently tractioning mandible.
Maintain contact through 3-5 cycles of cranial rhythm.
4. Integration: Gradually release both contacts while maintaining awareness of synchronous movement between structures.
5. Duration: Maintain contact for 2-3 minutes to allow for complete integration.
Client Guidance: “This technique integrates your jaw movement with the subtle motion of your cranial bones. By synchronizing these movements, we’re helping to establish a more harmonious relationship between your jaw and the rest of your cranial system.”
Temporal-Mandibular Relationship Restoration
The relationship between the temporal bones and mandible significantly influences TMJ function. These techniques address dysfunctional patterns in this relationship to create systemic improvement in jaw function.
Temporal Bone Balancing Protocol - ADVANCED
Temporal Bone Assessment
1. Position: Client supine, practitioner seated at head of table.
2. Contact: Place fingertips gently over mastoid processes bilaterally.
Cradle occiput with palms or support with table.
3. Assessment:
Monitor temporal bone movement through cranial rhythm cycles.
Assess external and internal rotation capacity.
Note asymmetries, restrictions, or quality differences between sides.
Correlate findings with TMJ dysfunction presentation.
4. Communication: “I’m assessing the bones that house your jaw joints to understand how their movement may be affecting your jaw function. These bones naturally move in subtle ways that influence how your jaw operates.”
V-Spread Technique for Temporal Sutures
1. Position: Client supine, practitioner seated at head of table.
2. Contact: Place fingertips over temporoparietal suture with index finger anterior and middle finger posterior to ear. Other hand mimics same position on opposite side.
3. Technique Application:
Apply gentle traction laterally with both fingers, creating a V-spread effect along the suture.
Hold until tissue softening is felt, following the release.
Repeat along the length of the suture, moving fingers as needed.
Pay special attention to areas of restriction.
4. Duration: Work with each suture area for 1-2 minutes.
Client Guidance: “I’m now helping release tension where your temporal bone connects with neighboring bones. This creates more freedom for your temporal bone to move properly, which directly affects your jaw joint function.”
Temporal Rock Technique
1. Position: Client supine, practitioner seated at head of table.
2. Contact: Cradle temporal bones bilaterally with fingertips on mastoid processes and palms supporting lateral skull.
3. Technique Application:
Generate gentle rocking motion of temporal bones, following cranial rhythm.
Encourage external rotation during flexion phase and internal rotation during extension phase.
Gradually amplify natural movement, staying within tissue comfort.
For asymmetrical patterns, spend more time facilitating movement on restricted side.
4. Duration: Continue for 2-3 minutes through several cranial cycles.
Client Guidance: “This gentle rocking motion helps your temporal bones move more freely in their natural pattern. As these bones house your jaw joints, this improved motion directly translates to better jaw function and reduced tension.”
Temporal Decompression Technique
1. Position: Client supine, practitioner seated at head of table.
2. Contact: Place fingertips on mastoid processes bilaterally.
Ensure gentle, precise contact without excessive pressure.
3. Technique Application:
Apply very gentle lateral traction to both temporal bones simultaneously.
Hold until tissue response is felt, typically 30-60 seconds.
Follow tissue release, allowing temporal bones to decompress from compressed position.
After lateral phase, introduce gentle inferior traction component.
4. Duration: Maintain decompression for 1-2 minutes.
Client Guidance: “This technique helps create more space around your temporal bones, reducing pressure on your jaw joints. Many clients report a sense of openness and ease throughout their head as these bones decompress.”
Temporo-Mandibular Synchronization
Temporal-Mandibular Coherence Technique
1. Position: Client supine, practitioner seated at head of table.
2. Contact: One hand contacts lateral aspect of temporal bone on affected side.
Other hand contacts lateral aspect of mandibular ramus on same side.
3. Technique Application:
Establish awareness of natural movement patterns in both structures.
Facilitate synchronous movement between temporal bone and mandible.
When restrictions are encountered, gently encourage freedom while maintaining relationship between structures.
Allow inherent motion mechanism to guide movement patterns.
4. Duration: Maintain contact for 2-3 minutes, following several complete cycles of motion.
Client Guidance: “With this technique, I’m helping establish better coordination between your temporal bone and jaw. This improved relationship is fundamental to resolving TMJ issues and creating lasting
change in function.”
Three-Point Temporal-Mandibular Balance
1. Position: Client supine, practitioner seated at head of table.
2. Contact: Three-point contact: mastoid process, glenoid fossa region, and mandibular angle.
Use thumb, index, and middle finger to create triangle of contact points.
3. Technique Application:
Establish equal awareness at all three contact points.
Allow for energetic balance to develop between points.
Follow subtle movement patterns that emerge.
Facilitate unwinding between these three key structural components.
Duration: Maintain balanced contact for 2-3 minutes.
Client Guidance: “This three-point balance helps integrate all components of your jaw joint system. By
establishing harmony between these key areas, we create a foundation for improved function throughout
your jaw and cranial system.”
Hyoid Release Techniques
The hyoid bone and its associated muscular and fascial attachments create a critical link between the jaw, cranial base, cervical spine, and thoracic inlet. Dysfunction in this system frequently contributes to TMJ issues and neck tension patterns.
Hyoid Assessment Protocol
1. Position: Client supine, practitioner seated at head of table.
2. Contact:
Place fingertips gently on hyoid bone in anterior neck.
Support posterior neck with other hand or table.
3. Assessment:
Assess hyoid position: central vs. lateral deviation.
Evaluate superior/inferior positioning relative to normal anatomical position.
Test mobility in all directions: lateral, superior/inferior, anterior/posterior.
Note tension patterns in suprahyoid and infrahyoid musculature.
4. Communication: “I’m assessing this small bone in your throat that connects your jaw to your voice box and collar bone. Its position and mobility significantly influence your jaw function, swallowing, and neck comfort.”
Direct Hyoid Release Technique
1. Position: Client supine, practitioner seated at head of table.
2. Contact:
Place thumb and index finger on lateral aspects of hyoid bone.
Support posterior neck with other hand.
3. Technique Application:
Apply gentle compression followed by traction in the direction of tissue restriction.
Follow tissue response, holding until release is felt.
Test movement in multiple directions: superior/inferior, lateral, anterior/posterior.
Focus on direction with greatest restriction.
4. Specific Directional Variations:
For superior restriction: Apply gentle inferior traction.
For lateral deviation: Guide gently toward midline.
For anterior restriction: Apply gentle posterior pressure.
5. Duration: Work with hyoid for 1-2 minutes total.
Client Guidance: “I’m helping release tension patterns around this small bone in your throat. This often creates significant relief in jaw tension and swallowing comfort. You may notice sensations of release extending from your jaw down into your throat and even chest.”
Suprahyoid Muscle Release
1. Position: Client supine, practitioner seated at head of table.
2. Contact:
Place fingertips in submandibular region between mandible and hyoid bone.
Support posterior neck with other hand.
3. Technique Application:
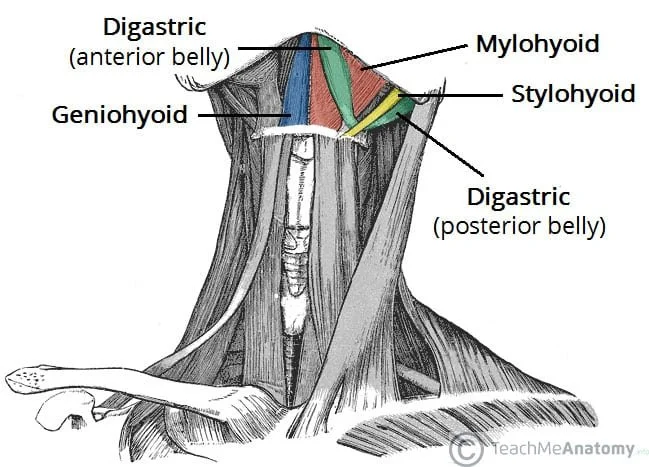
Apply gentle pressure to suprahyoid muscle group (digastric, mylohyoid, stylohyoid, geniohyoid).
Use small circular movements to engage fascial components.
Work systematically from midline laterally toward mandibular angles.
Incorporate gentle traction perpendicular to muscle fiber direction.
4. Duration: Work systematically through region for 2-3 minutes.
Client Guidance: “These muscles connect your jaw to the hyoid bone and significantly influence jaw position and function. Releasing tension here often creates immediate improvements in jaw mobility and comfort.”
Infrahyoid Chain Release
1. Position: Client supine, practitioner seated at head of table.
2. Contact:
Place fingertips on anterior neck below hyoid bone.
Support posterior neck with other hand.
3. Technique Application:
Apply gentle pressure to infrahyoid muscle group (sternohyoid, omohyoid, thyrohyoid, sternothyroid).
Use gentle superior-to-inferior strokes along muscle pathways.
Pay special attention to myofascial transition zones where tension often accumulates.
Work systematically from hyoid to sternal notch.
4. Duration: Work progressively through region for 1-2 minutes.
Client Guidance: “These muscles connect your throat to your chest and create a direct line of tension from your jaw all the way to your sternum. Releasing this chain often creates a profound sense of openness and ease throughout your neck and upper chest.”
Hyoid-Cranial Base Integration
1. Position: Client supine, practitioner seated at head of table.
2. Contact:
One hand contacts hyoid region with gentle, broad contact.
Other hand contacts occiput at cranial base.
3. Technique Application:
Establish energetic connection between both contact points.
Follow inherent motion between structures, allowing for unwinding of tension patterns.
Facilitate synchronization of movement between cranial base and hyoid system.
Allow for integration of previous releases throughout the entire system.
4. Duration: Maintain integrative contact for 2-3 minutes.
Client Guidance: “This integration technique helps establish a harmonious relationship between your cranial base and throat structures. This relationship is fundamental to resolving jaw issues, as it creates a balanced foundation for your entire head and neck.”